Welcome to the Lilly Bug Blog!

Please visit and see what's happening behind the scenes at Lilly Bug Studio.

Don't hesitate to leave a comment or to follow this blog.

And please remember to visit the Lilly Bug Studio website and the Lilly Bug Boutique Etsy store.

Thank you for visiting! :-)
Showing posts with label handmade. Show all posts

Monday, November 15, 2010

A Button Makeover

glitterfied buttons


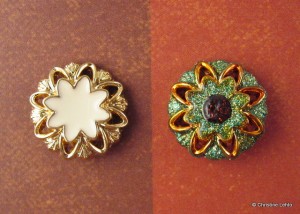
I love buttons as much as I love glitter, so why not combine the two for a “cute-as- a-button sparkly” project? Store bought buttons are great, but to add to my collection, I opted to make some of my own buttons using polymer clay. And of course I decided to embellish my buttons with some wonderful Art Glitter colors. I also decided to add a glittery surface to a couple of store bought buttons to show that you can transform an ugly store bought button into something pretty. One example of a rather “blah” looking button was this gold and cream colored button. It came in a bagged assortment of buttons and I honestly thought I’d never use this particular button for embellishing any of my projects. Instead of embellishing with this button, I embellished the button itself. After I added some glitter, I altered the gold color on the button with some alcohol ink. I like how the button turned out after some glitter and alcohol ink alterations. It didn’t take a lot of effort to get some pleasing results. I used the Designer Dries Clear Adhesive, #519 Reed and #58 Brown on the store bought “blah” button. How do you think it looks?
an ugly button gets a makeover

an ugly button makeover!


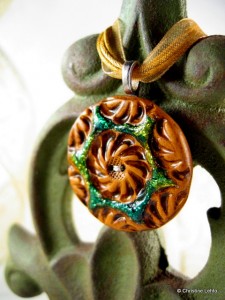
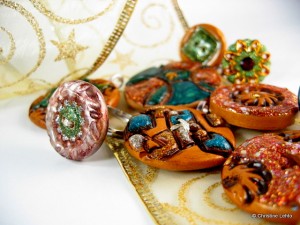
I used the same type of materials for my polymer clay buttons. First, I added the glitter with the Dries Clear Adhesive. Then I applied some glossy accents over the glitter. Next I decided to see how the alcohol inks would look over the glossy covered glitter. On one button I had used #84 Shiney Si Ultrafine Opaque glitter covered with glossy accents and used a mix of blue and butterscotch colored alcohol ink as a last layer. This created a new and interesting color effect over the glitter. The button is shown in the following photo.

green handmade button pendant

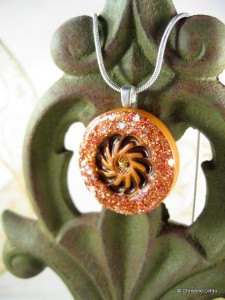
And of course I could not forget to add some of my favorite colored glitter to a few of my buttons. What color is that? It’s the #D1 Dazzlers Crazy Corn color. As I mentioned in a previous article, it’s hard not to add it to all my pieces because I love how sparkly it is and how there’s a variation of large pieces of glitter along with smaller pieces. Again, I used the Designer Dries Clear Adhesive for adding glitter to the polymer clay buttons. And I covered the Dazzlers Crazy Corn with the glossy accents to highlight the super sparkliness of this gorgeous glitter color. Look at it sparkle in the next couple of photos!

handmade glitter button pendant

Can you count how many buttons I used Crazy Corn on?

glittery buttons
After decorating the buttons, I made some of them into rings and some as pendants.
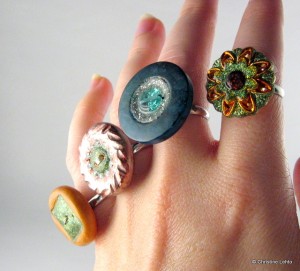
Glittery button rings

Supplies used for my buttons: #84 Shiney Si Ultrafine Opaque, #58 Brown Ultrafine Opaque, #D1 Dazzlers Crazy Corn, #519 Reed Microfine Opaque, #65 Old Gold Ultrafine Opaque, #184 T-Bird Ultrafine Pearlescent, Designer Dries Clear Adhesive, Ultrafine Metal Tip, Glossy Accents, alcohol inks, antique gel medium, thread, jewelry findings-ring bases & bails.
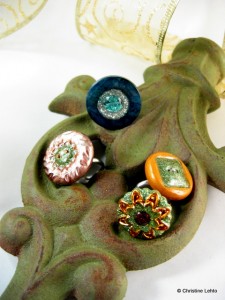
glittery button rings

Please visit my Etsy shop, Lilly Bug Boutique, where some of the pieces shown are available to purchase.

You can also visit my WordPress Blog to see the same post, eventually I will only be blogging using WordPress.
Friday, October 15, 2010

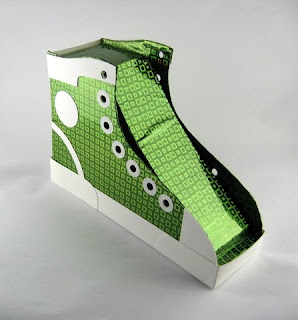
Green "shoe" box

I had fun making this box using cardboard packaging material and adhesive flicker green paper. It took longer to make than anticipated, but I am happy with how it turned out. I have an old book, "Creative Gift Wrapping" by Sandra Roth & Beverly Bieker, that shows how to make unique gift packaging and they made a sneaker box from a cereal box. I adapted mine to a smaller size. It was a perfect box to send to my favorite youtubers, Rhett and Link. I filled the box with Jolly Ranchers and shipped it out for Rhett's birthday. Earlier this year when it was Link's birthday in June, I sent them some gifts for his birthday. Some of the items that I sent made it into one of their vlog updates. Yay! Now I will see if my shoe box will make into one of their upcoming vlog updates.


The box opens at the tongue and is closed by lacing a real shoestring through it.


A peek at the inside of the box.

Wednesday, October 6, 2010

Glimmer Trees

For my business I make an assortment of sculptural pieces to make into pins or magnets. I recently made a sculptural tree design that was looking for something beyond the basic coat of acrylic paint. After adding some pizzazz with Art Glitter to some dull looking brads for a previous project, I decided that my new tree design would be a perfect candidate for a similar glimmer treatment. I make my sculptural pieces with resin after I first make an original piece in clay and make a silicone mold from that. With two newly cast, white resin trees ready to be decorated, I decided to make a tree to symbolize summer and one to symbolize autumn. Once my assortment of glitter grows, I’d like to make a tree to represent each of the four seasons.

To make my sparkly trees, I used a variety of glitter and I also tried a microfine glitter this time. I love the sparkle of glitter, but in order to prevent a “sparkle” overload, I varied the sparkle intensity by incorporating some types of glitter with less intense glimmer. This is when using the ultrafine pearlescents are a perfect choice. They are still rich, gorgeous colors, but just with a more subdued bling factor. Using the ultrafine transparent glitters also fit in well to keep the bling intensity under control. I also used a microfine opaque glitter, which gave an additional sparkle effect not seen in any of the other varieties of glitter. The microfine glitter gives a smoother, more uniform glitter effect whereas the ultrafine opaque gives a varied sparkle effect where the glitter sparkles at a variety of angles.

I really liked how my glimmer trees turned out. To try out a varied glitter project for yourself just remember the simple “variety” formula which can be altered with other glitters of your choice. The recipe for my summer tree was: 1 ultrafine transparent + 1 ultrafine pearlescent + 1 microfine opaque + 2 ultrafine opaque = a varied palette of glittery goodness.

For the summer tree I used: 44 Kelly (ultrafine opaque), 519 Reed (microfine opaque), 241 Fresh Lime (ultrafine transparent neon), 182 Astro Turf (ultrafine pearlescent) and 58 Brown (ultrafine opaque)

For the autumn tree I used: 91 Orange Crush (ultrafine transparent), 177 Florida Orange (ultrafine pearlescent), 1 True Red (ultrafine opaque), 62 Copper Canyon (ultrafine opaque) and 58 Brown (ultrafine opaque)

***Note: I also hand-painted an additional pair of trees to symbolize summer and fall, but they just don’t hold the same charm as the glittery ones. After something is glitter-fied, nothing else compares to it.


Monday, October 4, 2010

Look what came in the mail!


This year I participated in a Winter Holiday Gift Swap reader challenge through the Cloth, Paper, Scissors magazine. Awhile ago I sent out the "Wish" pin holiday gift that I made and then I waited until Cloth, Paper, Scissors sent me a gift from another reader who participated in the swap. Today I received my gift and it is so adorable. It's a whimsically embellished wooden decorative piece with a clothespin attached to the back so I can clip it onto something, possibly a picture frame. I absolutely love it.

The piece was mounted on an equally adorable handmade card complete with fun and cheerful ribbon embellishments.
I think my fellow reader and gift-giver must love glitter as much as I do. On the back of the card she printed a very glitter worthy quote, "You're not completely dressed until you have glitter on your face!" Reading that put a smile on my face, especially since I have a love for glitter and I am always thinking of new objects to glitter-fy. Caroline, thank you for the lovely handmade gift!

Want to see some of my glittery projects that I've written for Art Glitter? I have 4 more Art Glitter articles to write. Stay tuned!


Tuesday, April 13, 2010

Up-cycled Bottle Sculptures


re-Bottled couple

I have a tendency to hold onto items that I think I can make into something else. For instance, when I ran out of shampoo and conditioner, I thought I'd hang onto the empty bottles to use for a future sculpture project. I started out making cat sculptures from them.

re-Bottled sculpture

Since then, every time I come across a bottle ready to be tossed out, I think about what I could create with it. My latest creations called "Re-bottled" sculptures, are simple people sculptures. The first three that I made are shown here.

UpCycled Sculpture

Here's my little lady sculpture next to the same type of plastic bottle that I used to create her with.

UpCycled man and woman

Here's the Up-cycled couple next to similar bottles used to make them.

UpCycled sculptures

And last but not least, here's my Charles sculpture alongside my Up-cycled couple. Charles was made with an empty soy sauce glass bottle and I used 2 mini burned out halogen light bulbs to form his head. I love thinking of new things to make with items thought to be useless garbage. Hope you enjoyed seeing my Up-cycled work!

Thursday, March 4, 2010

All Buttoned Up with Handmade Buttons, part 2

button organizer

I am crazy about buttons, they are just so cute! Yesterday I blogged about my handmade polymer clay buttons and here's part two. I mentioned that I'm going to paint & glaze some of them to use as jewelry pieces (pendants, pins & rings). Today I found the correct glaze to use with polymer clay. I did some research online and found out that Varathane Diamond Polyurethane is one of the best glazes to use on polymer clay. Other glazes can eat away at the clay and cause the surface of the clay to become sticky.

pink metallic polymer clay buttons

Here are a few of the buttons I painted with some metallic silver, white & black paints.

gold polymer clay buttons

Here are some unpainted gold buttons I made.

polymer clay button collage
And here's a photo collage I made with some of my button photos! :-)

Hand-made Buttons!

click here to learn more about polymer clay glaze

Wednesday, March 3, 2010

All Buttoned Up with Handmade Buttons, part 1

I love buttons and right now I'm in the middle of a handmade button project. Here's a photo of my button work space. I'm making buttons with polymer clay and it's fun to create them.

button work space

Last Christmas I got a Dremel drill press and I'm so glad that I have one. It works wonderfully when I need to drill holes into my handmade buttons. All I need to do is line up my button at the base of the press, turn on the Dremel tool and pull down on the blue lever. It works like a charm!

drill press

How do you like my handmade buttons? What would you use them for? Maybe scrapbooking? I'm working on painting and glazing some of them. And I'd like to make them into pins, pendants and rings. Buttons are fun! :-)

Click here to see my first set of handmade buttons that I made last year.

handmade buttons

Tuesday, November 24, 2009

My Sweet Swapper Sabine

swap package

Ladipo of Structured Chaos, organized a fun Swap, Shop 'n Blog event and I decided to participate. My swap partner is Sabine from Southwest France. She has two shops, La Marquise des Anges and her most recent shop, Vintage Marquise. Both of her shops are gorgeous, sophisticated and elegant.

stamps on swap package

Look at all of the pretty French postage stamps and the leaves Sabine drew on the package.

Here is some of what she shared with me about herself.

She is 34 years old and married to a very patient and supportive husband. She is the owner of two naughty cats and one loving dog. Before embarking on her Etsy business, she worked in International Trade and later in Tourism Industry Studies. The work she did was exciting, but left little time for a private life. Sabine loves to read, cook, dance, craft, laugh.... :-)

swap package wrappings

Here's what I saw when I first opened the package, "Made with love for you dear swap partner"

Sabine has an addiction for all things "crafty and creative" and has had this creative appetite since she was a little girl. She embellishes, adorns, sews, creates all the time. First she made things for herself, then her folks and then requests from friends and friends of friends, etc. People in her life continued to encourage Sabine to being her own boutique, especially her husband. She says, "One day I woke up and told myself, 'let's start this new adventure.'"

swap package contents

On the back of the flower card she wrote me a little note. Isn't it pretty?

Her plans are to grow her business while continuing to achieve providing the best personlized service possible. Furthermore, she wishes to continue to network, make ne connections. She adds that, "being able to put food on the table while doing something you love is such a blessing..."

swap package note

Here's the sweet note that she wrote.

Not only does she feel "alive" when creating, she also feels "alive" in the midst of running her own business. Even when things are stressful and moments aren't "heaven on earth," she feels excited and motivated. She relishes how she feels/senses each cell in her body and the fact that she's not "stuck" in an office all day long. She enjoys making her very own decisions and above all she loves to be in contact with so many great people.

swap package contents

Here's the contents of my swap package.

One of her favorite shops is, Lilly Ella. Visiting her shop makes her happy and she says that she's lucky enough to own one of her gorgeous pieces of jewelry. She loves it.

swap package contents

e-mail: lmdamoail@gmail.com

etsy shops: www.lamarquisedesanges.etsy.com

www.etsy.com/shop/vintagemarquise

Sabine's beautiful blog: http://lamarquisedesanges.blogspot.com

towel

A beautiful towel from her shop. I'm afraid to use it, I don't want to get it dirty.

swap package contents

Some "homemade" lavendar and a pretty flower.

Thank you Sabine for a pretty package! :-)

Check out Sabine's blog and see what I sent to her in France.


Here's a little French lesson provided by Sabine:

à bientôt (with the accents) : means see you later, see you soon.

a marquise des anges .
marquise means "marchioness" , it is a noblewoman ranking above a countess and below a duchess
and ange means ... angel.
la marquise des anges could translated as the machioness of angels.
it comes from an old movie, a little old fashioned and "passé" but it is related to one of my very very favorite childhood memory ...when I was sitting on a decades old sofa, in between my beloved grand father and grandmother...watching this movie (it is a serie of movies) which was my grandfather's favorite ..; each year we used to had this little.
when I close my eyes and remember this lovely moment, I can feel my grand mother 's hand on my knee with tenderness, I can smell her fragrance, a combination of lavender and hoemade apple pie, as weel as the sweet blend of my grand father's tobacco pipe ...

Thursday, May 21, 2009

Life of an Artful Pen from beginning to end, part 3 the "finale"

Artful Pen title with buttons

Ta-da, it's the "finale" of my Artful Pens in process series. Now you can see my Bee Artful Pens "buzzing" through my blog in living color. But first things first. My last entry ended with the process of mold-making. Now I'll discuss what happens after the molds and castings are made.

bees attached to pen

The photo above shows my bee pieces attached to the pen clip with some strong glue. Note, the pen clip was first covered with a layer of Apoxie Sculpt to ensure a good foundation to build my design upon. And the beauty of Apoxie Sculpt is that it adheres to itself and beomes a "solid" piece after being placed on another piece. This characteristic of Apoxie Sculpt ensures that my design is solidly attached to the pen clip.

bees on pen

After I attach the bees to the pen clip with glue and I patiently wait for the glue to set, I go back and fill in any "open" areas with some Apoxie Sculpt. To help smooth out the Apoxie Sculpt, I use some water on my fingertips. This can be a sloppy/drippy process. If I get any drops of water mixed with some Apoxie Sculpt on the pen surface, it will be permanently be there once it's cured. And that's not the result I want to end up with. Thus, I use a clear sheet of plastic beneath the pen clip to help prevent drippy drops from messin' up my pen surface. Another method I recently used to prevent this messy problem is using a coat of liquid mask on the pen cap surface. It's a bit smelly, but works pretty nicely and after I'm done with the pen, the liquid mask peels away. You can see the liquid mask "in action" in the next couple of photos. That gummy yellow looking surface is the liquid mask safely protecting the pen surface.

bee pen after dremeled

There's the liquid mask on the pen cap of a bee piece that just went under the Dremel treatment. I try to clean up and smooth out the surface of my pieces when needed. And my Dremel stone grinding bit works wonderfully to tackle this cleaning task.

bee pen

In the photo above, I used a yellow colored Apoxie, to touch up areas on the bees. Yes, Apoxie Sculpt comes in a few different colors, but my preference is using the neutral gray color for most of my work.

pens getting gesso coat

After the Dremeling is completed, it's time to put a coat of gesso on the surface. This helps me see if there are any remaining areas that need to be cleaned. Plus, it provides a nice surface/foundation to start painting.

So, now comes the fun part, the painting. The pens go from this:

bee pens pre-gesso

. . . to this, pens with a colorful coat of paint . . .

bees painted

. . . and finally, pens coated with some glaze to protect the painted surface.

bees finished

What pen design is your favorite, A, B, C or D? Please comment below.

pens finished

One other thing I wanted to share is that one of my spotlights that I created at the ByHand site is featured at the ByHand Gallery blog. Yay!!! Stop by and check it out. I created a spotlight of some the adorable and colorful items from some of my "hearted" Etsy stores.

ByHand Gallery spotlight