Welcome to the Lilly Bug Blog!

Please visit and see what's happening behind the scenes at Lilly Bug Studio.

Don't hesitate to leave a comment or to follow this blog.

And please remember to visit the Lilly Bug Studio website and the Lilly Bug Boutique Etsy store.

Thank you for visiting! :-)
Showing posts with label Lilly Bug Boutique. Show all posts

Monday, November 15, 2010

A Button Makeover

glitterfied buttons


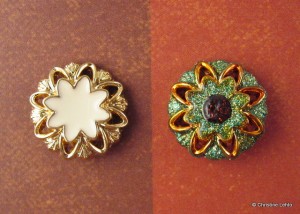
I love buttons as much as I love glitter, so why not combine the two for a “cute-as- a-button sparkly” project? Store bought buttons are great, but to add to my collection, I opted to make some of my own buttons using polymer clay. And of course I decided to embellish my buttons with some wonderful Art Glitter colors. I also decided to add a glittery surface to a couple of store bought buttons to show that you can transform an ugly store bought button into something pretty. One example of a rather “blah” looking button was this gold and cream colored button. It came in a bagged assortment of buttons and I honestly thought I’d never use this particular button for embellishing any of my projects. Instead of embellishing with this button, I embellished the button itself. After I added some glitter, I altered the gold color on the button with some alcohol ink. I like how the button turned out after some glitter and alcohol ink alterations. It didn’t take a lot of effort to get some pleasing results. I used the Designer Dries Clear Adhesive, #519 Reed and #58 Brown on the store bought “blah” button. How do you think it looks?
an ugly button gets a makeover

an ugly button makeover!


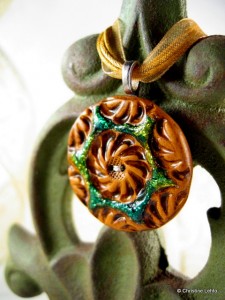
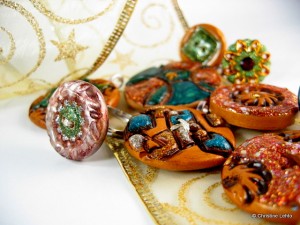
I used the same type of materials for my polymer clay buttons. First, I added the glitter with the Dries Clear Adhesive. Then I applied some glossy accents over the glitter. Next I decided to see how the alcohol inks would look over the glossy covered glitter. On one button I had used #84 Shiney Si Ultrafine Opaque glitter covered with glossy accents and used a mix of blue and butterscotch colored alcohol ink as a last layer. This created a new and interesting color effect over the glitter. The button is shown in the following photo.

green handmade button pendant

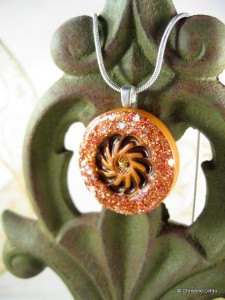
And of course I could not forget to add some of my favorite colored glitter to a few of my buttons. What color is that? It’s the #D1 Dazzlers Crazy Corn color. As I mentioned in a previous article, it’s hard not to add it to all my pieces because I love how sparkly it is and how there’s a variation of large pieces of glitter along with smaller pieces. Again, I used the Designer Dries Clear Adhesive for adding glitter to the polymer clay buttons. And I covered the Dazzlers Crazy Corn with the glossy accents to highlight the super sparkliness of this gorgeous glitter color. Look at it sparkle in the next couple of photos!

handmade glitter button pendant

Can you count how many buttons I used Crazy Corn on?

glittery buttons
After decorating the buttons, I made some of them into rings and some as pendants.
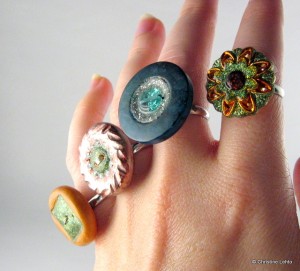
Glittery button rings

Supplies used for my buttons: #84 Shiney Si Ultrafine Opaque, #58 Brown Ultrafine Opaque, #D1 Dazzlers Crazy Corn, #519 Reed Microfine Opaque, #65 Old Gold Ultrafine Opaque, #184 T-Bird Ultrafine Pearlescent, Designer Dries Clear Adhesive, Ultrafine Metal Tip, Glossy Accents, alcohol inks, antique gel medium, thread, jewelry findings-ring bases & bails.
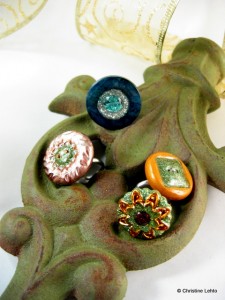
glittery button rings

Please visit my Etsy shop, Lilly Bug Boutique, where some of the pieces shown are available to purchase.

You can also visit my WordPress Blog to see the same post, eventually I will only be blogging using WordPress.
Tuesday, April 13, 2010

Up-cycled Bottle Sculptures


re-Bottled couple

I have a tendency to hold onto items that I think I can make into something else. For instance, when I ran out of shampoo and conditioner, I thought I'd hang onto the empty bottles to use for a future sculpture project. I started out making cat sculptures from them.

re-Bottled sculpture

Since then, every time I come across a bottle ready to be tossed out, I think about what I could create with it. My latest creations called "Re-bottled" sculptures, are simple people sculptures. The first three that I made are shown here.

UpCycled Sculpture

Here's my little lady sculpture next to the same type of plastic bottle that I used to create her with.

UpCycled man and woman

Here's the Up-cycled couple next to similar bottles used to make them.

UpCycled sculptures

And last but not least, here's my Charles sculpture alongside my Up-cycled couple. Charles was made with an empty soy sauce glass bottle and I used 2 mini burned out halogen light bulbs to form his head. I love thinking of new things to make with items thought to be useless garbage. Hope you enjoyed seeing my Up-cycled work!

Saturday, March 27, 2010

An UpCycled Answer & The Winner Is.....

Hello to my blogging fans. Thanks to all of you who participated in my blog giveaway. I plan on doing some more giveaways this year, so stay tuned. I asked you to answer the question about what UpCycled item I used for my Susan sculpture. As most of you guessed, it is in fact a light bulb.

I also have used the smaller, itty, bitty burned out halogens to make mini sculptures. I named these 2 mini ones after my nieces, Kristin & Katrina. The one in pink is Kristin, who happens to have a similar hairstyle as the sculpture. The one in yellow is Katrina.


I got these mini halogens from a store I worked at. Anytime there was a bulb that burned out, I asked if I could have it.


Anyway, the random number generator picked number two, which belonged to Melissa. Congrats to Melissa! You will be getting a Mr. Fluffy Bum Bottom pin and Petite Purse mailed to you just in time for Easter.

Thursday, March 18, 2010

Win a Bunny Pin & Petite Purse

Hello! In honor of Easter and to celebrate the growth of my Facebook fan page I'm going to have a free giveaway at my blog starting today. I have a fun little quiz for anyone interested in entering to win one of my "Mr. Fluffy Bum Bottom" bunny pins and one of my Petite Purses. A picture of Mr. Fluffy Bum Bottom is shown below.

The exact Petite Purse will be a surprise. Here's a sampling of some of my Petite Purses, which come in a small & a large size. The small size is perfect for giving a small gift in like a pin, magnet or necklace, the larger size is the perfect size to hold a gift card or a small trinket/treasure. This giveaway will be for the smaller size Petite Purse.Now it's quiz time! Shown below is a photo of one my sculptures named Susan (after one of my sisters). She likes the dress and said she would wear a dress like that one, so when I was thinking of a name for her, I decided to name her Susan. Anyway, my question to you is.....what did I use for the structure of this sculpture? Clue: It's an object that I UpCycled. Another way to get a clue is to visit my store and look in my UpCycled sculpture section and find out what I used for some of those pieces.

Contest closed. Time to pick a winner!
All correct answers will be entered into a drawing for the bunny pin & purse. Please include your e-mail address in your comment/answer, otherwise you won't be entered into the contest even if you answered correctly. Contest closes at 11pm CST on Thurday, March 25th. Good luck!

Thursday, March 4, 2010

All Buttoned Up with Handmade Buttons, part 2

button organizer

I am crazy about buttons, they are just so cute! Yesterday I blogged about my handmade polymer clay buttons and here's part two. I mentioned that I'm going to paint & glaze some of them to use as jewelry pieces (pendants, pins & rings). Today I found the correct glaze to use with polymer clay. I did some research online and found out that Varathane Diamond Polyurethane is one of the best glazes to use on polymer clay. Other glazes can eat away at the clay and cause the surface of the clay to become sticky.

pink metallic polymer clay buttons

Here are a few of the buttons I painted with some metallic silver, white & black paints.

gold polymer clay buttons

Here are some unpainted gold buttons I made.

polymer clay button collage
And here's a photo collage I made with some of my button photos! :-)

Hand-made Buttons!

click here to learn more about polymer clay glaze

Wednesday, March 3, 2010

All Buttoned Up with Handmade Buttons, part 1

I love buttons and right now I'm in the middle of a handmade button project. Here's a photo of my button work space. I'm making buttons with polymer clay and it's fun to create them.

button work space

Last Christmas I got a Dremel drill press and I'm so glad that I have one. It works wonderfully when I need to drill holes into my handmade buttons. All I need to do is line up my button at the base of the press, turn on the Dremel tool and pull down on the blue lever. It works like a charm!

drill press

How do you like my handmade buttons? What would you use them for? Maybe scrapbooking? I'm working on painting and glazing some of them. And I'd like to make them into pins, pendants and rings. Buttons are fun! :-)

Click here to see my first set of handmade buttons that I made last year.

handmade buttons

Saturday, February 27, 2010

I love the Winter Olympics!


I've enjoyed watching the 2010 Vancouver Winter Olympics this year, Apolo Ohno, Shaun White, Bode Miller, Evan Lysacek, Lindsey Vonn and so many others made this year's Olympics so exciting to watch. I am going to miss watching the Olympics once they're over. What has been your favorite Olympic moment from this year?

In honor of the Olympics, here is a funny video of "Office Chair Skating" by my favorite you tubers, Rhett & Link. Enjoy! :-)

Wednesday, February 10, 2010

Reversible Glass Tile Pendants

glass tile pendants

Here's a look at some new additions to my Etsy shop. I decided to try out making some glass tile pendants with photos that I've taken of flowers, etc. As you can see, I also made a pendant with one of my watercolors of my Lilly the Ladybug storybook character.

glass tile pendants

While making these pendants, I thought it would be nice to offer a reversible option to wearing the pendant. On the back of the glass tile & photo, I applied a layer of Apoxie Sculpt with a glittery coat embedded to the surface of Apoxie Sculpt. The glitter is adhered to the Apoxie surface so it won't flake off. However, to be certain, there won't be any loose glitter, I coated the surface with a protective glaze.

glass tile pendant

So how do you like the idea of a reversible glass tile pendant? And also, do you have a favorite from the pendants pictured?

Last year I did a blog post about when I made my first glass tile pendant from a starter kit. It gives a little bit of an inside look about making the pendants. If you're interested, click here.

Tuesday, December 8, 2009

Playful Penguins & Snowflakes

"Green" Penguins Playing in the Snow. Here are my UpCycled Sculptures made with burned out light bulbs.

Penguin Sculpture

These penguins are ready to play in the snow. In honor of the anticipated blizzard here in Wisconsin, my Playful Penguins proudly display snowflakes. I am not a fan of Wisconsin winters and snow, cold, etc. One of these days I hope to move to warmer, more mild temperate state. Do you like winter weather? And if so, what is your favorite part of winter and what do you like to do in the winter?

Penguin Sculpture

My Recyc-a-lite Penguin holding a snowflake.

I make these penguin sculptures using burned out light bulbs and Apoxie Sculpt. After I'm done sculpting them, I paint them with acrylic paint. Prior to covering the bulb with Apoxie Sculpt, I decide what the penguin will be holding or doing. Once I decide what the penguin will be doing, I begin to form the wing structure with wire mesh and masking tape. Depending on what the penguin is holding, the wing sculpting process can be tricky because once I cover it with Apoxie Sculpt, it can be difficult to make additional changes.

Penguin Sculpture

I try to vary what my penguins hold in their wings and what they do, to keep things from becoming stagnent. After I had a large stash of burned out bulbs from a local recycling center, I tried to sketch out a variety of penguin "activities" to help me figure out how to begin sculpting each penguin.

Penguin Sculpture

If you'd like to learn more about how I make my Playful Penguin sculptures, click the following:

Playful Penguin Process, Part 1

Playful Penguin Process, Part 2

Stop by my Etsy shop to see my line of Upcycled Sculptures.

Penguin Sculpture

Monday, December 7, 2009

Have a Cuppa Java

coffee cup magnet

Need a caffeine & cute fix? Here are some of my new coffee cup magnets that I sell at my Etsy store, Lilly Bug Boutique.

These magnets are fun to make. I love to pick out a color palette and having a "blank cup" to make a variety of designs on. If you have any ideas for a design to paint on a coffee cup, please let me know. Also, if you're interested in having a custom cup made for you or for a gift, I'd love to do a custom order for you. I also can make a coffee cup pin to wear, if you'd like a pin to match a magnet or a pin instead.

coffee cup magnet

One of my first coffee cup designs. The first coffee cup I made was attached to a personlized pen for a line I call "Artful Pens".

cup of coffee

I love the color combination of these bright colors of blue, magenta and green.

pink coffee cup

A nice pink colored coffee cup. :-)

ladybug coffee cup

And last but not least, a ladybug coffee cup. Since I'm a ladybug lover, I could not resist painting a cup with a ladybug design.

Which cup is your favorite?

Monday, October 19, 2009

Artisan Co-op in Janesville!

Grand Opening at Co-op

My sister, Sue & I in front of co-op on Grand Opening Day

Last month my sister, Sue and I joined an Artisan Co-op in Janesville, WI. My sister designs beaded jewelry pieces and I make a variety of items from pins to sculptures. Sandra, the co-op owner found me via my Etsy store and asked if I'd be interested in joining her Art Co-op. As a matter of coincidence, my sister was with me when I met with Sandra. As I was talking to Sandra she said that she was looking for jewelry to sell at the co-op. I went to tell my sis to see if she wanted to talk to Sandra about joining. How's that for being at the right place at the right time?

inside of co-op

The location of the co-op is a bit of a drive for both of us, but one good thing about the location is that it's about halfway for us to see each other. My sis lives three hours away from me, but the co-op is approximately an hour and a half away for each of us. Thank goodness we are able to work together on our co-op work days. One requirement for joining the co-op is working one day per month at the co-op.

artisan co-op

Last week my sister and I decided to work two days in a row and stay overnight at a hotel in Janesville. We had a fun time on our mini time away. Last week was our 3rd and 4th days of working at the co-op. During our first three days of working there, we had no sales. Thankfully, on our fourth day, last Friday, we had four sales. We were so excited to finally work a day and have someone buy something.

Artisan Co-op

One purchase from Friday was of a painting from a co-op member, Pam, who we have become to know since she works in the same building as the co-op. Each day she works, she stops in to say hi. And on Friday just after stopping in and telling us she still has not sold anything, my sister sold one of her paintings. We were so happy for Pam. After awhile I decided to try to find Pam's office on one of the floors above the co-op. I found her office and told her the good news. She was so happy. She gave me a hug and wanted to do a happy dance. The painting that she sold was one that her husband told her would never sell and Pam told him that it would be the first painting she would sell. And it was!

Artisan co-op

After our second day of working at the co-op, my sister and I were trying to think of some ideas to try to promote the co-op. One idea was to print postcards to hand out to people in the offices above the co-op. We had some postcards printed and last week on Thursday, we went to deliver them to the offices after we were done working.

my sis at beading table

My sister Sue at her beading table at co-op

Then on Friday, we had more customer traffic in the co-op. My sis was convinced that our postcards helped bring some of the traffic in. On Friday afternoon, I dropped of some postcards at a local cafe across the street from the co-op. The food in the cafe looks delicious. Next time I work at the co-op I want to buy some food from the cafe. I also stopped at, Carousel Consignment, a nice antique shop with so much to see, and dropped off a rack card for them to hang at the counter of the store.

jewelry display

While at the hotel, I helped my sister name her jewelry pieces. I try to encourage my sis to name her jewerly with unique names, instead of naming it "magenta & black beaded necklace", I recommend something like "magnificent magenta." On Thursday while at the co-op I was having a dry spell trying to think of names for her, but later at the hotel the names were coming more easily. I joked telling my sis that it must've been because I needed to eat some chocolate to get the ideas going again. :-)

my pins and magnets at co-op

My pins (shown on left) & my magnets (shown on right) at co-op

my turtle sculpture

My turtle sculpture at co-op